How to Configure Audio Device Priorities in Pipewire / Wireplumber

Posted by Scott on Aug 1st, 2022

I have several audio devices connected to my Linux desktop machine, including a USB audio interface (a MOTU M4), and a Jabra wireless headset that uses a USB dongle, and appears as its own audio device. I also like to use Bluetooth headphones on a daily basis.

After switching to Pipewire as my audio backend, I found that my default audio device wasn’t switching automatically to what I wanted – I’d always have to set it manually. I’d need to do this when my BT headphones would connect (select the a2dp headphone profile), and then again when I disconnected them (because I wanted to hear sound from my MOTU audio interface, but it would automatically fallback to the Jabra headset device). This is a two-part recipe to fix these issues.

Step 1: Make pipewire automatically select my Bluetooth headphones sink when they connected. This didn’t require any configuration changes. Instead, I have a script which runs on startup of my desktop environment which runs pactl load-module module-switch-on-connect. This is actually a pulseaudio command, but desktop apps still use the pulseaudio interface, which pipewire implements as part of the pipewire-pulse package.

Step 2: Make my default audio device my MOTU M4 audio interface, and stop selecting the Jabra headset device when I disconnect my BT headphones. This turned out to be caused by the fact that the Jabra audio device had a higher priority than my audio interface. Run the command wpctl status to show a list of your audio devices, and make a note of the device number. In this case, I was looking for the M4 device in my list of Audio Sinks. Then you can run wpctl inspect <device-number> to show the details of this audio device. What you’re looking for are the fields priority.driver and priority.session. Larger numbers correspond to a higher priority, but for sinks, they should be kept no larger than 1500 (otherwise a sink’s monitor could end up being selected as a default source – this is called out in the Wireplumber documentation). In my case, the Jabra sink had a priority of 1008, so I chose to set my audio interface to a priority of 1050.

To change this configuration, you’d do so in Pipewire’s session manager. The preferred session manager for Pipewire is Wireplumber, which uses lua scripts to apply these kinds of custom configurations. So in my case, I created the file ~/.config/wireplumber/main.lua.d/60-raise-motu-m4-priority.lua with the following code:

rule = {
  matches = {
    {
      { "node.name", "equals", "alsa_output.usb-MOTU_M4_M4MC0570FU-00.Direct__hw_M4__sink" },
    },
  },
  apply_properties = {
    ["priority.driver"] = 1050,
    ["priority.session"] = 1050,
  },
}

table.insert(alsa_monitor.rules,rule)

Then, restart the wireplumber service with systemctl --user restart wireplumber and compare the new output from wpctl inspect. You should now see that the driver and session priorities are what you set them to. And when pipewire automatically switches to a new audio device, the highest priority device should be chosen.

I’ve found Pipewire and Wireplumber’s documentation to be confusing, and there are lots of dead-ends you can go down when researching how to do this. I hope this recipe-style blog post is easier to understand if this is the problem you’re trying to solve.

Many thanks to PleasantlyFlailing on the r/linuxaudio subreddit for suggesting some improvements to this blog post!
How to Disable Audio Devices in Pipewire / Wireplumber

Posted by Scott on Aug 1st, 2022

I’ve recently made the switch to using Pipewire on my Linux desktops. One thing I noticed in my list of audio devices was an entry for my HDMI monitor, which I never planned to use. I also do some music production on my Linux machines, and disabling this audio device would help my patchbay configurations look a bit cleaner.

Pipewire’s documentation is pretty basic, and when searching for this solution online, I went down several incorrect paths. We could really use more recipe-style examples on the web, so here’s mine. This is done using the Wireplumber session manager.

First, identify the audio device to disable using pactl list short. In the output from this, I could see an entry for the audio sink (alsa_output.pci-0000_27_00.1.hdmi-stereo-extra2.monitor) and for the audio device (alsa_card.pci-0000_27_00.1). It’s the alsa_card device that you want to disable, not the sink.

Wireplumber uses lua scripts to apply these kinds of custom configurations. So in my case, I created the file ~/.config/wireplumber/main.lua.d/51-disable-hdmi-devices.lua with the following code:

rule = {
  matches = {
    {
      { "device.name", "equals", "alsa_card.pci-0000_27_00.1" },
    },
  },
  apply_properties = {
    ["device.disabled"] = true,
  },
}

table.insert(alsa_monitor.rules,rule)

Then, restart the wireplumber service with systemctl --user restart wireplumber and this audio device should now be gone – you won’t see it in your sound settings or in your patchbay diagrams.

For reference, the above is working for pipewire v0.3.56 and wireplumber v0.4.11 on Manjaro Linux. I ultimately learned this via the Arch Wiki page for Wireplumber, though at first I got confused about the need to specify an audio device instead of a sink. That caused me to think this was the wrong solution, and I spun my wheels for more than a week trying other things (e.g, turning the device profile off in pavucontrol) which didn’t work.

Configuring the GNOME Shell Panel with Firefox and Thunderbird Profiles

Posted by Scott on Apr 2nd, 2020

Mozilla’s Firefox web browser and Thunderbird e-mail clients have a little-known feature known as “Profiles.” Profiles allow you to create fully separate instances of these applications, each with their own customized config preferences and extensions.

I make heavy use of this feature to create separate Firefox profiles for my personal everyday web browser, work web browser, web development browser, etc. With Thunderbird, I use profiles to separate my personal vs. work email.

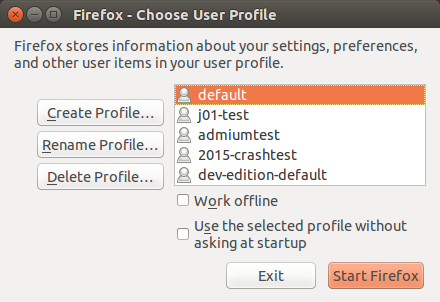
From the command line, invoking firefox or thunderbird with the -P option will bring up a dialog box, allowing you to chose between your existing profiles, or create/rename/delete profiles:

If you haven’t created any new profiles, you’ll be using a profile named default. On my Ubuntu systems, each of these profiles will be stored under your ~/.mozilla/firefox/ directory (for Firefox) or ~/.thunderbird/ directory (for Thunderbird).

If you want to be able to easily launch these profiles from the GNOME Shell GUI rather than the command line, you can create custom launchers for each profile. I typically do this and choose different icons for each profile to visually tell them apart. To do this, create a .desktop file within your ~/.local/share/applications/ directory. I typically name these files firefox-<profile-name>.desktop. Here’s an example of one:

[Desktop Entry]
Version=1.0
Name=Firefox (WebDev)
Exec=firefox -P webdev -no-remote --class FirefoxWebDev
Comment=firefox
Terminal=false
Icon=/usr/share/icons/oxygen/base/128x128/categories/applications-development-web.png
Type=Application
StartupWMClass=FirefoxWebDev

By default, the Icon setting will search for an icon file (e.g, .svg or .png file) from your current theme within your /usr/share/icons/ directory. Specify an absolute path to the icon file and include its filename extension if you want to use an icon that’s not in your current theme. You can also create custom icons and drop them in your ~/.local/share/icons/ directory.

Note that on the Exec line I’m also starting firefox with two additional options, -no-remote and --class. The -no-remote option prevents conflicts with other instances of Firefox that are running. The --class option specifies a window manager class, which you’ll also set for the StartupWMClass option. You can set this value to any string you like, but it must be unique (i.e, don’t re-use it in another .desktop launcher config).

If you don’t set a custom window manager class, all of your running profiles will be grouped together under the same icon in the GNOME Shell panel. That last subtlety has been an annoyance I’ve wanted to fix for a long time, and learning about it is what prompted me to write this post to share.

References: Mozilla docs on using the profile manager, AskUbuntu post on setting the window manager class

ProgressPuppy: A Fun and Simple Task Manager

Posted by Scott on Sep 18th, 2019

I’ve been taking a self-funded sabbatical from work this summer, and set out with a bucket list of things I’ve always wanted to get around to doing but never felt I had the time to fully dive into. One of those things was to take a Ruby on Rails based task manager that I’ve been using personally for the past year and refine it as needed so I could launch it as a legitimate production-level application.

What does production-level mean to me? In this case, a bunch of things:

  • The app needs to have solid multi-user support with account registration, password resets, etc.
  • Testing and Test Driven Development should be taken seriously. Unit, integration, and selenium-based system tests should reach well over 90% code coverage.
  • The code should pass linting tools such as rubocop and rails best practices, as well as security auditing tools such as brakeman
  • The code deployment process should be simple, capable of rollbacks, and automatable (I’m using capistrano)
  • The server infrastructure that ProgressPuppy relies on should be easily replicable at the push of a button (using infrastucture as code tools such as Terraform and Puppet)
  • The application should have a robust backup and restore process
  • I should be able to keep the application up to date with the latest stable versions of Ruby on Rails and its dependent gems (the app is currently running on Rails 6.0)
  • Use Stripe to accept payments for paid plans
  • Deploy a marketing web site to showcase what ProgressPuppy does and its various plan tiers

The point of this hasn’t been to create a side project that generates significant income – I don’t mind at all if no one but me and a handful of friends ends up using ProgressPuppy. Instead, I wanted to go through the exercise of treating the web app more seriously, but keeping it within a limited scope where the learning would remain fun.

To say that this effort took up a lot of time would be an understatement, but the fun factor remained strong the entire time. I use this tool as my daily task manager, and the various memes that pop-up after completing tasks still bring a smile to my face:

Check out ProgressPuppy if you get a chance. I don’t pretend to have much in the way of web design skills, but the web app is functional and reliable, and I intend to keep it that way as I make further improvements to it. Next on my roadmap is to introduce some daily habit tracking features and make the app more mobile web browser friendly.

ProgressPuppy is also open source software, released under the GNU Affero GPL license. You can find its source code repo on GitLab.

Dealing with the Great Firewall of China – May 2019 Notes

Posted by Scott on May 24th, 2019

I returned to China during a three country East-Asia trip this Spring, and thought I’d share some more notes on being able to work remotely while in China. Some things worth sharing have changed since my last blog post on the topic in 2016.

One thing that’s interesting about the Great Firewall (GFW) is that China uses it for censorship of its mainland residents, but doesn’t do so for residents of Hong Kong, even though many of the same Chinese telecoms offer services there. I’ve heard that if you buy a prepaid sim card in Hong Kong, and use it in mainland China, your cell data service is not blocked by the GFW. So I was going to buy a prepaid Hong Kong sim before my trip until I learned that you can also buy sim cards from foreign providers that can work at 4G speeds in roaming mode in multiple countries. As I was traveling to Japan, Korea, and China, I started looking for a single sim solution that would work in all three countries.

What I found (and which worked flawlessly) was the AIS sim2fly prepaid sim card, which you can buy on Amazon. AIS is one of the biggest telecom companies in Thailand, and they claimed that these cards worked at full 4G speeds in roaming mode in several Asian countries, and that the service was not blocked by the GFW when used in China. They offer an 8-day prepaid sim with 6 GB of data (tethering supported), which was more than enough data for me. I ended up buying a few of these, so that after 8 days I simply popped in a new sim card and I was good to go for another 8 days. On top of that, using these sim cards was cheaper than if I were to have bought separate sim cards for Japan, Korea, and China. I’d highly recommend the AIS sim2fly prepaid sims for these kinds of trips.

As for the times I had to use a VPN over wifi, I did some more research and learned that Astrill is still a reliable provider. As of late, ExpressVPN seems to have become mostly unusable in China based on my research, though I didn’t try to use it personally during this trip. Anytime I had to use Astrill (which I typically used in their Wireguard mode), my speeds were extremely slow (1-2 Mbps) compared to what I’d get tethered to my smartphone AIS connection. Also my VPN would disconnect at random times – sometimes it would work reliably for a half-hour or more, and other times it would disconnect every few minutes. So my advice is if you don’t need to stream a lot of data, it would be far more convenient to rely entirely on smartphone tethering for your internet needs, assuming you’ve got good cell data coverage in the area you’ll be visiting. For any major city in China, this will be a non-issue.

An unrelated observation I had while in Beijing was that none of the locals used cash – everyone paid for things using WeChat Pay.
Unfortunately, you can’t link a foreign debit card to your WeChat Pay account – it only works with cards issued by Chinese banks.
So I was often the annoying foreigner who paid for things with cash. At one bakery, they even refused to break a 100 RMB note (worth around $14 USD) because they didn’t have enough change in their register. Being able to use WeChat pay unlocks a lot of other conveniences you can use in China, such as Didi (their equivalent of Lyft/Uber) rideshare payments, bike rentals, etc. So if you’re going to be in China for a long time (e.g, over a month), it may be worth the effort to open a Chinese bank account and keep a small amount of money in it for use with WeChat Pay.

Dealing with the Great Firewall of China – October 2016 Notes

Posted by Scott on Nov 5th, 2016

Last month I visited Beijing, China and had to work remotely during my trip. At work we rely on a number of Google services, so I needed a reliable way to circumvent the Great Firewall of China (GFW). After doing a decent amount of research, I learned that just running a SOCKS proxy via SSH is likely to run into problems, so I used a couple of commercial VPNs, as well as a private Shadowsocks server I had set up on various ports of a Digital Ocean droplet. The idea being to have a couple of fall-back methods to tunnel through the GFW in case my primary one stopped working. I thought it might be useful to report on what worked well, and what was most challenging about this.

Given that I’m a Linux user and needed solutions that were Linux-friendly, I settled on two highly recommended commercial VPNs – ExpressVPN and Astrill. I also sprung for the added “VIP” add-on to Astrill that gives you access to a few additional VPN endpoints that presumably have lower utilization. In summary, Astrill was the clear winner, especially with the VIP add-on. Though no matter which VPN service I was using, there was a lot of fiddling that had to be done to test the latency of different proxy endpoints. There wasn’t one I could just set and forget.

Finding usable wifi in Beijing is another story, and proved to be a frustrating problem. My local resident friend told me that the Chinese tend to use the internet for recreation rather than getting work done, so the vast majority of folks packed in coffee shops are streaming video to watch movies or TV shows. My own observations backed this up, and it was easy to notice this, as a sizable proportion of these folks don’t bother to use headphones when watching their entertainment (grumble). So I found the only times I had really solid wifi speeds were when I found a coffee shop that was mostly empty, and probably half the time I gave up on the wifi and just tethered to my phone’s data connection. For most of my work I was running remote builds over SSH, and I found my phone’s data connection was laggy in a more consistent way than when I tried to use wifi in a busy cafe.

Regarding SIM cards in China, I have some tips to share as well. I ended up buying a prepaid China Unicom SIM with 2 GB of data from Amazon before I left for my trip, which was incredibly convenient. The way this works is you buy the SIM online, they send it to you, and you have to activate it over email with the seller. Once the SIM is activated, the 90-day lifetime of the SIM doesn’t start until you actually begin to use it, so you can complete the activation well before your trip and then pop the SIM card into your phone once you land in China. I have no complaints about dealing with the seller LvyCom on Amazon and would definitely recommend them.

So how was ExpressVPN? Decent and reliable, but not especially fast. I found it helped significantly to change the connection type from “auto” to “udp”, but Astrill’s Openweb connection type still beat it when it came to speeds. But to set expectations – generally the speeds were still slow. My friend had an 80 Mbit home internet connection which I tested without the VPN enabled, but once I enabled a VPN, the best I could get from it was around 3-5 Mbit. This was generally only good enough to watch YouTube videos at 480p. My friend was quite surprised when I told him I always watch YouTube at home at 1080p resolution with no hiccups or delays.

Shadowsocks turned out to be the least reliable method of tunneling out of China, sometimes working well and sometimes not working at all. Since it’s a lot of extra effort to set up a Shadowsocks server compared to just using a commercial VPN, I don’t think it’s necessary unless you want to have that extra peace of mind.

Overall I was able to get work done while in China, but it was regularly a frustrating experience to deal with the lack of bandwidth and annoying latency on SSH terminal sessions. Oh, and bring good headphones if you plan to try to work from coffee shops!

Photos from my recent trip to Beijing can be found here. For news about the GFW and VPNs, I recommend greatfire.org.

Mount Saint Helens Vista

Posted by Scott on Aug 5th, 2016

This video sums up one of my favorite reasons for being alive:

Setting up the LIVA Mini PC (BayTrail Atom) as a Headless Server with Ubuntu Xenial 16.04

Posted by Scott on Apr 26th, 2016

A while back I had picked up a neat little fanless Intel Atom computer based on the BayTrail N2807 CPU. It’s a dual-core system running at 1.6 GHz and has 2 GB of RAM and onboard flash disk, and seemed ideal as a micro server for my home LAN.

The device turned out to be a bit flaky to set up, so I thought I’d share my installation notes here. There are multiple revisions of this mini PC, and I believe I have one of the first versions. The case looks like this:

LIVA Mini PC

LIVA Mini PC

First, I created a USB flash drive with the Ubuntu 16.04 server install image using Ubuntu’s Startup Disk Creator app. Then, plug in an HDMI monitor and wired keyboard to the Liva. Hit F7 when the BIOS screen comes up and select the flash drive to start the installer.

The main issue I ran into was during the disk partitioning step. If I chose one of the guided partitioning options, the process wouldn’t complete, and raised an error about “Identical mount points for two file systems” on the flash storage.

After several unsuccessful attempts to try other options, I found a solution that worked. First, choose manual partitioning mode. Select the entire disk, and create a new partition table. Then select the free space and have it create partitions automatically. At this point I could save these changes and have the installer proceed past the partitioning step.

Everything else in the installer is pretty straightforward. Once I had everything set up the way I wanted, I disconnected the monitor and keyboard and intended to use the system as a headless server. However, the system refused to boot without a monitor attached. I tried several modifications to my GRUB bootloader command line to try to work around this, but had no luck. If someone knows the customization to make here, please let me know and I’ll update this post with the info.

Instead, I chose the lazy option. You can buy “dummy” HDMI connectors that emulate a monitor – for example here’s one that you can use.

Once I connected that to my Liva Mini PC, it was able to boot up headless and the device is now usable to me again.

I hope this information might be useful to others trying to make use of this handy mini PC system.

Next »

Blog Badges


[FSF Associate Member]

Archives